Follow Me on Pinterest
Showing posts with label dessert. Show all posts

Saturday, December 28, 2013

Turtle Surprise Brownies

It’s not New Years yet, which means most of us still have a couple more days to indulge before the resolutions take over. So you better try these in the next few days! They are still more healthy than your typical brownie but they do have some extra sugar and calories for the turtle center. I’d trade the taste of these brownies for any number of calories though! They have a gooey, caramel center complete with mixed nuts, sandwiched in between two layers of cakey brownie. Oh so good… This serves about 16


1 package of brownie mix (I like Bob’s Red Mill)
1 cup water
¼ cup applesauce
1 over ripe banana
1 Tbsp olive oil
1 tsp vanilla extract
1 cup sugar or honey
½ cup butter (I used Earth Balance Dairy free)
1 Tbsp milk
1 cup mixed chopped nuts (I used pecans, peanuts and almonds)


In a large mixing bowl, blend together brownie mix, water, applesauce, banana, oil and vanilla until smooth. In a saucepan, melt butter. Add in sugar, milk and vanilla until boiling. Boil for about 7 minutes or until sugar is complete dissolved. In a greased 9x13 baking pan, spread half of the brownie batter. Sprinkle mixed nuts over batter and pour over caramel sauce evenly. Top with remaining batter. Bake at 350°F for about 25-30 minutes or until brownies are cooked through. 

Friday, December 20, 2013

Peanut Butter Cupcakes with Peanut & Chocolate Sauce

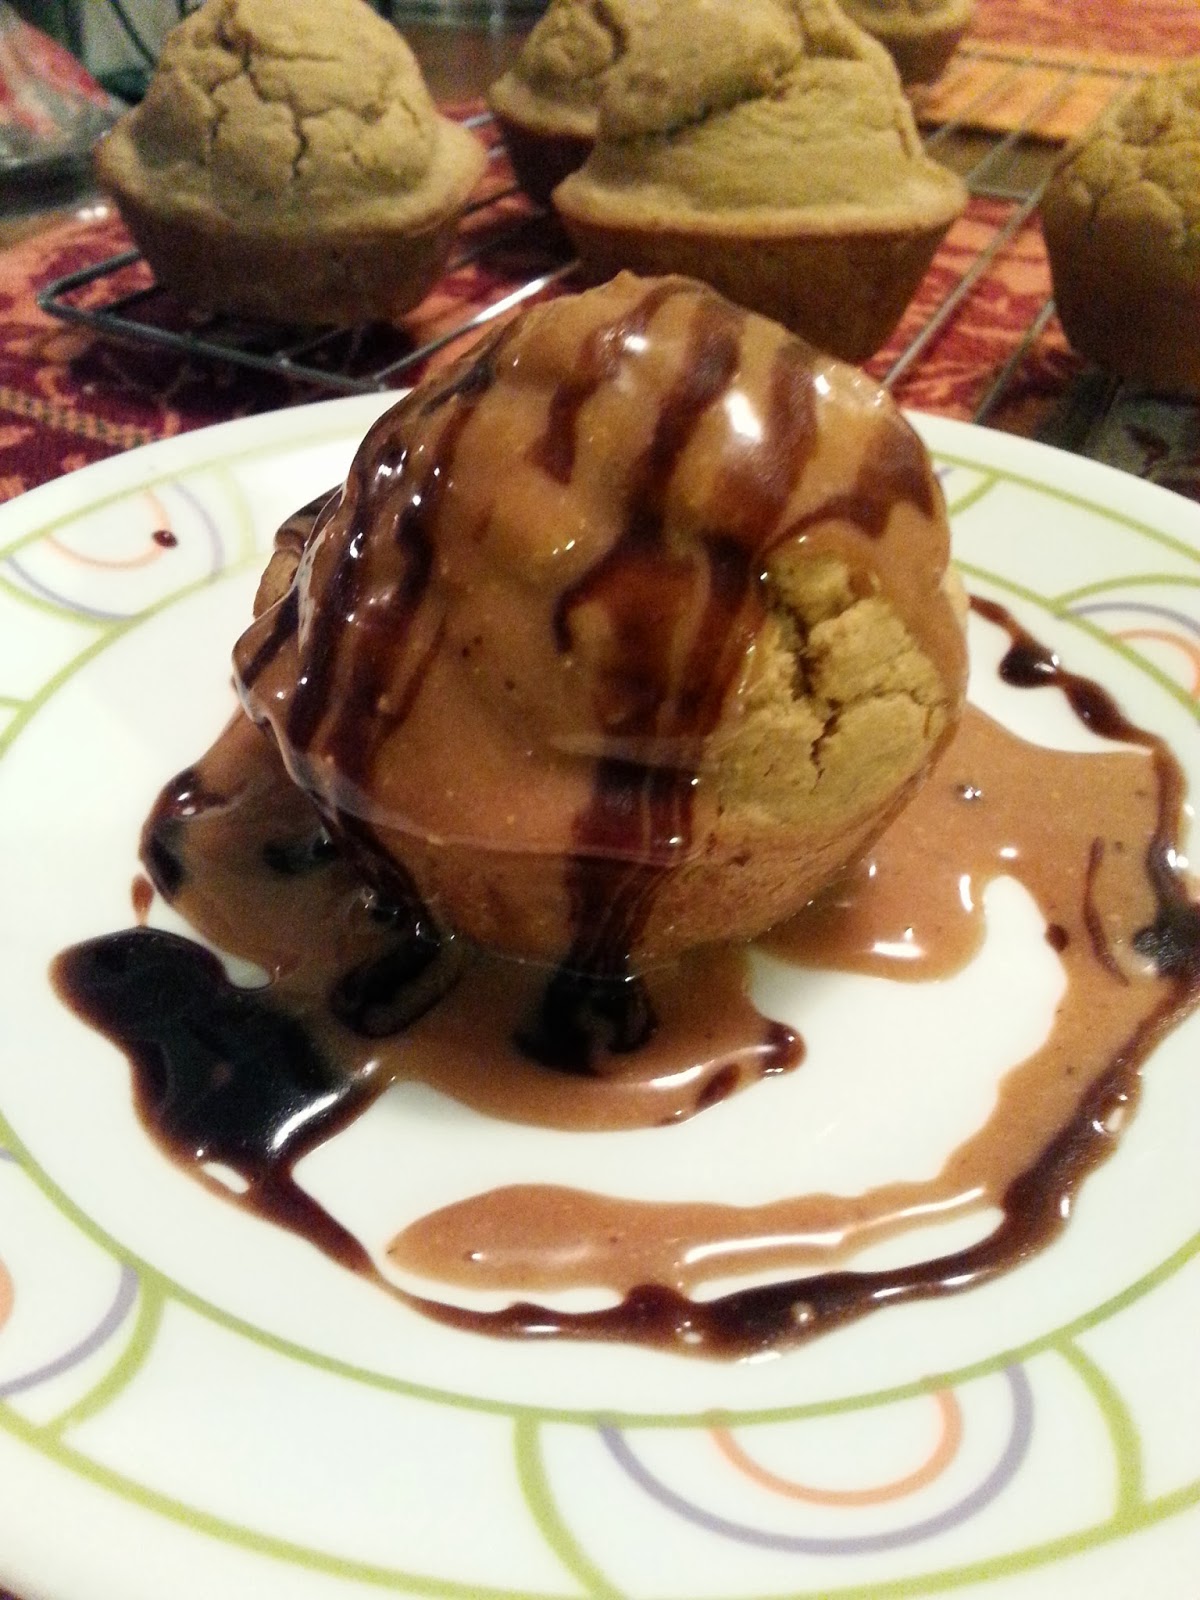
This evening my husband wanted peanut butter something. So I was going to make a cookie and my son pipes up with I want a peanut butter and jelly cookie! It then evolved into a peanut butter chocolate cupcake; so you can thank them for this creation. I was so impressed with the flavor and texture of the cupcake. It is very moist and airy tasting; not at all dense like some gluten free baked goods can taste. The sauce however was supposed to be a frosting so I did have an epic fail moment there. Oh well – it tastes wonderful! Be on the lookout for a peanut butter and jelly cookie something or other though – that sounds like I challenge I’m ready to try! This makes 9 cupcakes

½ cup sweet sorghum flour
½ cup brown rice flour
¼ cup almond flour
¼ cup tapioca starch
1 tsp baking powder
½ tsp baking soda
1 tsp xanthan gum
½ tsp sea salt
1 cup almond milk
¼ cup applesauce
¼ cup peanut butter, creamy (almond butter would work also)
1 egg
1 tsp vanilla
Chocolate Sauce
¼ cup carob chips or chocolate chips
1 Tbsp almond milk
Peanut Sauce
¼ cup peanut putter
½ cup peanut butter powder (PB2)
¼ cup tapioca starch
½ cup powdered sugar or coconut sugar
½ cup almond milk


  • In a large mixing bowl, combine flours, starch, baking powder, baking soda, xanthan gum and salt. Add in milk, applesauce, peanut butter, egg and vanilla. Blend over medium speed for about 1 minute or until ingredients are well combined. 
  • Pour batter into greased muffin tins (or tins lined with baking cups). Bake at 350°F for about 20-25 minutes or until cupcakes are baked through. Let cool about 10 minutes. 
  • While cupcakes are baking, combine ingredients for chocolate sauce in a glass bowl. Microwave for about 30 seconds or until chips are melted. Stir to blend sauce. 
  • In a separate mixing bowl, combine peanut sauce ingredients and blend over medium speed for about 3 minutes or until well combined. 
  • Drizzle peanut sauce over cooled cupcakes. Top with drizzled chocolate sauce. 

Friday, December 13, 2013

Cranberry Currant Persimmon Bars

Sometimes I go to the store and see something weird. And then I think, “I want to try that!” I don’t know why but I decided I was going to buy some persimmons at the store. I’ve never had them, had to clue what they tasted like or how to cook them. I let one get really ripe and knew it was going to be really mushy so I decided to make these bars with them. The almond-date crust is really easy to make and is a great alternative to grain crusts. The fruit mixture is very similar to a jam and the crumble topping kind of ties it all together. These are a great little treat that is gluten free, grain free, dairy free, low fat, kid friendly! It’s just great and pretty easy to make! The flours can be easily substituted to whatever you have on hand. Makes a 9x13 pan of bars.


Crust
1 cup dates (10 regular dates, pits removed)
1 cup plain almonds
½ cup water
½ cup coconut flour
¼ cup coconut sugar or stevia
Fruit Filling
2 medium persimmons, chopped (about ½-3/4 cup)
½ cup chopped cranberries
1/3 cup dried currants or raisins
¼ cup water
½ cup coconut sugar or stevia
Crumb Topping
½ cup almond flour
½ cup coconut flour
¼ cup coconut sugar or stevia
1 tsp cinnamon
1 Tbsp olive oil
1 Tbsp butter or coconut oil (I used dairy free)
1 tsp almond milk or water


  • In a blender, puree almonds, water and dates together until smooth. In a bowl, add in date mixture and remaining crust ingredients and mix until well combined. 
  • Spread into a greased 9x13 baking pan. Bake at 375°F for about 15 minutes or until lightly browned. 
  • In a saucepan, combine fruit filling and bring to boil over medium heat. Cook for about 10 minutes or until mixture starts to thicken. Pour fruit mixture over crust. 
  • In a small bowl, combine topping ingredients and blend together with a fork until crumbly. Sprinkle crumb mixture over fruit filling. 
  • Return bars to oven and bake for an additional 10 minutes or until crumb topping starts to brown. Let cool about 15 minutes and cut into bars. 

Tuesday, December 3, 2013

Chocolate Peppermint Layer Cake


So I tried to think of a witty name for this masterpiece… but nothing came to me. It was until I tasted it that I decided it was so similar to a cup of hot cocoa stirred with a candy cane. It was so moist and airy with a deep chocolate taste topped with marshmellow crème frosting and crushed candy cakes… oh perfection! Don’t be scared of the four layers – if I can do it, you can do it! Here’s a suggestion though, if you are going to have a cake with several layers, use a separate cake pan for each layer. For example, this cake is four layers, so use four cake pans and divide batter into four sections. I only had two cake pans so I just make two layers and cut each layer in half. It was difficult to keep the layers from falling apart after cutting, but I managed (just would have been better if I’d had more pans). This cake also freezes well. Just bake the layers, freeze, thaw before serving and frost as normal. It’s perfect for those holiday parties when you want a fancy looking dessert without a lot of work.


1 box of GF chocolate cake mix (I like Namaste brand but any kind should work)
3 eggs
1 ½ cup water
½ cup applesauce
¼ cup crushed peppermints or candy canes
1 recipe of frosting (I prefer marshmellow crème but vanilla sugar frosting would work also)
1 cup crushed peppermints or candy canes
  • In a large mixing bowl, blend together cake mix, eggs, water and applesauce until well blended, about 2 minutes.
  • Pour batter into greased 9” round baking pans. Bake at 375°F for about 25-30 minutes or until cooked through.
  • Let cool for about 30 minutes on a wire rack and cut cakes in half if necessary to make 4 layers.
  • Make frosting according to instructions.
  • On a serving dish, place the bottom layer of cake. Add ¼ of the frosting mixture and sprinkle crushed mint over frosting. Repeat with remaining layers.
  • Refrigerate any leftovers. This serves about 12.

Sunday, December 1, 2013

Pumpkin Cranberry Dump Cake


If you’ve never had a “dump” cake, you are missing out. This simple and quick technique delivers a unique tasting dessert that you can customize to your desires. All you have to do is figure out your base and “dump” a box of dry cake mix on top (hence the name, dump). I traditionally see it made with cherry pie type filling or pineapple. I wanted a winter version of the dish so I decided to add in pumpkin and cranberry with a cinnamon walnut topping. It’s a little more work than a typical dump cake but it’s so good and so easy to make!

1 can pumpkin puree
1 cup fresh cranberries
¼ cup coconut sugar
¼ cup apple juice
1 banana
½ cup almond milk
1 pkg of GF vanilla cake mix (I used Bob’s Red Mill)
¼ cup butter, coconut oil or shortening, cut into very small chunks
½ cup chopped walnuts
1 Tbsp ground cinnamon
  • In a small saucepan, combine cranberries, coconut sugar and apple juice. Cook for about 10 minutes over medium heat until berries start to pop and soften.
  • In a small blender (I used my Magic Bullet), puree banana with almond milk. In a large bowl, stir together banana mixture with pumpkin.
  • Fold in cranberry mixture and carefully swirl together.
  • Pour pumpkin mixture into the bottom of a greased 9x13 baking pan.
  • Pour dry cake mix evenly over the pumpkin until covered. Place the small chunks of butter or shortening over the cake mixture.
  • Sprinkle over cinnamon and walnuts.
  • Bake at 375°F for about 40 minutes or until the topping starts to brown. Let cool about 15 minutes before serving.

Tuesday, November 26, 2013

Pumpkin Pie Ice Cream


I know it’s fall and everyone is giving out recipes for pies, cakes, warm dishes, etc. Just because it is getting cooler outside doesn’t mean you can’t have a cool refreshing dessert sometimes to. Plus, my son’s go to dessert is either popsicles or ice cream – no matter what time of year it is. Anyway, I caved into his constant begging for ice cream but gave it a fall twist. I also added a little cheat by topping his with caramel sauce – of course that was the best part to him! To make this I used my YoNanas maker – it is awesome! It takes frozen bananas or other fruits and turns them into something wonderful! You could also make this using a high powered blender. Either way, grab a few extra ripe bananas at the grocery store and freeze them for future ice cream nights. This makes one serving

1 frozen banana, broke in half
¼ cup pumpkin puree
½ tsp cinnamon
½ tsp coconut sugar
1 Tbsp whipped cream, optional
1 tsp caramel syrup, optional
  • If using a blender, combine banana, pumpkin, cinnamon and sugar and blend well for about a minute or until smooth.
  • If using a YoNanas maker, take one half of the banana and put it in the maker. Start blending and add in pumpkin, cinnamon and sugar. Add second half of banana to maker and finish blending. Top bananas with whipped cream and caramel syrup if desired.
  • What I like best about using bananas to make “ice cream” is that it tastes so great and creamy that it feels like you are eating something not so great for you. The best part is you are not – simply natural fruits!

Sunday, November 24, 2013

Thanksgiving Menu Ideas


I can’t believe it is already time to post this. I’m a little nervous about the holidays this year. This will be the first year for a gluten-free Thanksgiving. Last year I was on a pretty strict diet, but I cheated a little and suffered the consequences. This year – none of that! I’m not nervous about the food. I’m nervous about the interactions during meal time. I definitely don’t want to hurt feelings or step on toes about not eating what the family cooks. However – I simply can’t afford to have a bad day due to poor diet choices. So here goes nothing (wish me luck!) As I’m sure many of you are doing, we are traveling some. We aren’t traveling far but we do have several dinners to go to or make. One thing I will miss this year – my mom’s pumpkin pie and my mother-in-law’s ham. Oh gosh… my mom always makes an extra pumpkin pie, just for me! I take it home; eat it again that night, for breakfast the next day, etc. We will have to work on an alternative but for now, no “Mom’s Famous” pumpkin pie for this girl. I’ve learned that you shouldn’t have to suffer or feel guilty about not eating holiday meals. There are many options out there; you just have to find what’s best for you. What we have decided to do is to just make our own “traveling” Thanksgiving dinner. I will make our own meal and take it to the dinners we are going to. For those coming to our house to eat, they can eat what we cook. If they don’t want to, they can bring their own. It’s not the best solution I’m sure, but it’s the best one we’ve come up with. I can’t touch, eat, or be around gluten. If anyone has other suggestions – I’m all for hearing about them! Anyway – I wanted to present some options to any of you having this same problem. Or if any of you are just wanting to try something new this holiday season, try one of the recipes below! Either way, it’s Thanksgiving and it’s a great time of year to be thankful for what we have. Whether you are doing a typical family tradition, or like us – trying something new, just remember how fortunate we all are. I sometimes find myself wondering why this happened to me, but at the end of the day I have to be thankful. I’m thankful God put me in this position to help me learn and challenge me. I have learned so much about taking care of my body and my health. My situation has also made me realize how fortunate it is to enjoy a meal with family. Something as simple as dinner can be taken away so quickly. Some may not be able to enjoy Thanksgiving dinner due to food allergies or illnesses. Others may simply not be able to afford it. Regardless, I am so very thankful for the opportunity to create a tasty, healthy meal on this wonderful day and I hope you all are too. Of course, I’m thankful for millions of other things but this is a food blog after all! Check out the full day’s menu options below and try some of the recipes – they should all be linked to the original posts complete with pictures. Have a wonderful and blessed Thanksgiving!


Breakfast:
Gluten Free Cinnamon Rolls (Maple or Original)
Banana Oatmeal Pancakes – my most popular! (for extra energy if you have having a late lunch)
Cinnamon Scones
Appetizers
Shrimp Dip
Veggie Pizza
Watermelon Mint Jam – served with crackers/chips
Smoked Chicken Antipasto
Lunch/Dinner:
Spinach Stuffed Chicken Breasts - for an alternative to turkey
Made Over Mashed Potatoes
Balsamic Green Beans
Roasted Fall Veggies
Deceptive Mac & Cheese
Stuffed Acorn Squash (or stuffing)
Mushrooms, Onions & Swiss Chard
Butternut Pumpkin Biscuits
Red Wine Cranberry Sauce
Desserts
Upside Down Apple Cake
Cranberry Pear Crisp with Lavender – my favorite!
Pumpkin Snickerdoodles
Pumpkin Chocolate Chip Cookies – for the kids!
Pumpkin Pie with Almond Crust – if you want to get real fancy
Beverages
Apple Cider
Pumpkin Spiced Chai Latte
Strawberry Lemonade  - for the kids


Thursday, November 21, 2013

Cranberry Pear Crisp with Lavender Crumble


If I could bottle the smell of this dish, I could make millions! This dessert smells absolutely wonderful cooking and tastes even better! I love a good fruit crisp. They are so easy to make and very versatile. I’ve already posted a couple crisp recipes – Cherry Rhubarb is one of my favorites also! I haven’t made a pear crisp before but I needed a quick dessert one evening and my mother-in-law brought over TONS of fresh Asian pears so I thought I would try. I love the combination of pears and cranberries. I also like adding just a little something extra and I thought that lavender would complement the fruits nicely. It turned out great! This would be a perfect addition to your holiday menu!

6 pears, peeled and sliced into ¼” slices
½ cup dried cranberries
½ cup chopped pecans
1 Tbsp cinnamon
½ tsp nutmeg
½ tsp allspice
¼ cup coconut sugar
2 Tbsp GF all purpose flour
1/3 cup fresh pear juice (or apple juice)
Topping
1 cup GF oats
¼ cup potato starch
¼ cup rice flour
1 tsp cinnamon
¼ cup butter or coconut oil
1 tbsp fresh lavender, finely chopped
  • In a large bowl, mix together pear slices, cranberries, pecans, cinnamon, nutmeg, allspice, coconut sugar and flour. Carefully mix with your hands until fruit is coated with dry mixture.
  • Pour fruit mixture into a greased 3 qt baking pan or a 9x13 pan and drizzle fruit with juice.
  • In a separate bowl, combine oats, potato starch, rice flour and cinnamon. Cut in butter or coconut oil.
  • Blend butter and flour mixture with a pastry blender until it resembles coarse crumbs. Stir in lavender.
  • Sprinkle topping mixture evenly over fruit.
  • Bake at 350°F for 50-60 minutes or until crumb topping is slightly brown. Let cool for about 10 minutes. Refrigerate leftovers.

Friday, October 4, 2013

Peanut Butter Banana Dessert Parfait


So I’m really trying on my carbs… really I am. But boy is it hard. I’m a sucker for desserts. Every evening my sweet tooth gets the best of me. Not to mention, I have all of these items in my pantry and fridge to make all kinds of gluten free baked goods. They might be gluten free, but they are not carb free. So I tried to find me something that was relatively low in carbs but would also satisfy my sweet tooth. This probably won’t be a treat that I get to have a lot, but it was sure good while it lasted! This recipe makes about two servings


1 banana, diced
1 Tbsp almond (or peanut) butter
1 small graham cracker square (I used a slightly modified version of my homemade batch – see here!)
1 Tbsp cocoa nibs (or mini chocolate chips)
1 Tbsp yogurt (or whipped cream)
  • Put diced banana into a serving bowl (or two small bowls if you separate the servings).
  • Crumble graham cracker square over the top of the banana.
  • Dab on your almond butter. Sprinkle with cocoa nibs or chips.
  • Top with yogurt or whipped cream, if desired.
  • Serve immediately – this does not keep well as your bananas will brown quickly!

Friday, September 27, 2013

Fruit Salad with Honey Lime Dressing


Fresh summer fruit is great but unfortunately it is coming to an end! Now that we have cut out a lot of heavy carbs, gluten and started eating more clean, we fill up on fresh fruit and veggies. Typically we eat them plain but occasionally I like to give fruit a little extra something. This honey lime dressing was so easy to throw together and complimented the fruit wonderfully. It goes really well with the papaya and pineapple. Feel free to enjoy as much of this salad as you want – you shouldn’t have too much guilt about it!


Fruit Salad
1 cup fresh pineapple, diced
1 red plum, sliced
1 cup fresh papaya, diced
1 cup fresh grapes, halved
Honey Lime Dressing
½ cup water
¼ cup honey
1 Tbsp fresh mint, finely chopped
1 lime, zest and juice
  • Mix together fruit in a serving bowl.
  •  In a small bowl or carafe bottle, mix together lime juice, lime zest, water, honey and mint. Stir until well blended.
  • Drizzle a little dressing over fruit salad and serve.
  • Best if served over fresh fruit immediately, but the dressing will keep for a few days in the refrigerator.

Friday, September 6, 2013

Chocolate Zucchini Cake with Chocolate Glaze


You know those desserts you get at restaurants that are titled “Monster  Cookie”, “7 layer Chocolate Cake”, “Death by Chocolate Cake”?? Well, this could have a title something like those. I mean who doesn’t want a “death by chocolate” cake?? I never had room for dessert when we ate out so I’ve only had a few of these items in my years. However – just because we are gluten free now, doesn’t mean we have to miss out on “dangerous” desserts like these. Here’s another one of my splurge recipes but it’s still healthy enough you don’t have to feel too guilty about eating it. I apologize for the picture; it was so good my son couldn’t even wait for me to take a picture before sneaking a bite! J

1 package of GF chocolate cake mix (you can make your own also, I used Bob’s Red Mill brand)
1 cup milk (I used vanilla almond milk)
1 Tbsp lemon juice
2 large eggs
1 tsp vanilla (2 if you used plain milk)
1 cup shredded zucchini
Glaze:
1 bag of chocolate chips (I used GF, dairy free, but any kind would work)
1 Tbsp milk (I used almond)
1 tsp coconut oil
  • Mix together chocolate cake mix, milk, lemon juice, eggs and vanilla for about 30 seconds on low speed. Add in shredded zucchini and blend for another minute. P
  • our cake batter into a greased 9x13 cake pan. Bake at 350°F for about 30 minutes or until cake is cooked through (a toothpick inserted should come out clean).
  • Let cake cool for about 10 minutes.
  • While cake is cooling, melt chocolate chips and coconut oil in microwave according to package instructions. Add in milk and stir until well combined.
  • Pour glaze over cooled cake and serve.
    • NOTE: You can make a round cake using two round cake pans; just adjust your cooking time accordingly. This also makes create cupcakes!
    • You can also make your glaze in a saucepan if you don’t use a microwave – just be sure to make sure it doesn’t scorch in the pan.

Wednesday, August 28, 2013

Homemade Twix Bars


I have two favorite candy bars, Twix and Reese’s. Before my health problems, I would buy the bags of the bite size bars for holidays (Easter, Christmas, etc). I always had to buy two bags at least because I knew I would eat one bag before I could give them away. Of course, we don’t have candy at the house now. One day I decided we would have a little cheat day and I would make my own Twix bars. They turned out great! I will also give you a heads up – I will be posting homemade gluten free peanut butter cookies (similar to the Girl Scout Peanut Butter Patties). Those are equally fantastic!

1 package of cookie mix (sugar or shortbread preferably – I used Bob’s Red Mill Shortbread)
¼ cup coconut oil
½ cup applesauce or yogurt
1 large egg
¼ cup water
¾ cup caramel sauce (store bought or made with ½ package of Kraft caramels, melted)
½ cup chocolate chips
1 Tbsp almond milk
  • Mix together cookie mix, oil, applesauce, egg and water until mix is well combined and crumbly. It will look very dry – this is fine.
  • In a greased 9x13 baking pan, press cookie dough until it covers the bottom of the pan. Try to make the cookie dough as level as possible in the bottom of the pan.
  • Bake the cookie dough at 350°F for about 10 minutes or until just slightly browned along edges.
  • While your cookie is baking, make your caramel sauce or just warm up over low heat in a saucepan. Once the cookie has finished baking, pour over caramel sauce. Let set for about 20 minutes.
  • Melt chocolate chips and almond milk together either over the stove or in microwave according to your chocolate chip package instructions. Pour chocolate sauce over caramel cookie. Let this set for about 20 minutes.
  • Cut into pieces and serve. Cover and refrigerate leftovers.
    • NOTE: I froze my bars instead of letting them cool for 20 minutes. We also liked eating them cold.
    • Also – you can bake your cookies according to package instructions if desired – I just lightened ours up a bit.
    • This recipe will cover a 9x13 pan, but we ended up just using a 9x5 bread pan and also made some plain cookies, it all depends on how much you want to make!

Wednesday, August 21, 2013

Rhubarb-Cherry Crisp


This recipe was kind of a brilliant mistake. We were going to dinner at a friend’s house so I decided to make a dessert the night before. I made my traditional strawberry-rhubarb crisp but I had a LOT of extra crumb topping leftover so I decided to make another small batch. Only problem was I was out of strawberries and apples. I did have a BUNCH of cherries that needed eaten and a couple pineapple slices. That’s how this lovely concoction was made. It is just the perfect amount of sweet and tart flavors and really just screams summer with the fresh fruit taste.

Filling
2 stalks of rhubarb, diced (about ¾ cup)
2 cups of cherries, halved (pits removed – could also use 2 cans of cherries)
2 slices of fresh pineapple, chunked (about ½ cup)
1 Tbsp honey or other sweetener
1 tsp cinnamon
Topping
¼ cup coconut flour
¼ cup GF all purpose flour (or omit coconut flour and use ½ cup all purpose flour)
½ cup GF oats
¼ tsp salt
1 Tbsp brown sugar
1 tsp cinnamon
1 Tbsp coconut oil
  • Mix together filling ingredients in a greased 9” pie plate.
  • Mix together the topping ingredients into a small bowl until it crumbly.
  • Sprinkle crumb mixture over fruit evening and bake at 350°F for about 20 minutes or until bubbly and brown on top.


Tuesday, August 6, 2013

Almond Joy Brownies


So I know I said this was a “healthy” blog (or at least an attempt at one), but these are definitely not healthy and definitely worth having to work out a little extra. I mean – just look at the picture! I’m a firm believer in have a “splurge” day sometimes. Of course, too much of a good thing can turn bad real quick so enjoy these in moderation. Honestly though, these are still gluten-free, lower in fat and somewhat healthier than if you made the real version.

Brownie bottom
1 package of gluten free brownie mix (we like Bob’s Red Mill or Namaste)
3 eggs (or equivalent egg substitute)
½ cup non fat Greek yogurt, vanilla
½ cup applesauce
½ cup water
  • Whisk together all ingredients until well blended. Pour into a 9x13” baking pan.
  • Bake at 325°F for about 30 minutes or until brownies are cooked through. (I wanted a crispier crust so I baked mine for a little longer)
    • NOTE: If you’d rather, you could just make the brownie mix according to the package – I just cut out the extra fat in the oil it called for).
    • Once it has finished baking, cool brownies for about 20 minutes.
Coconut Filling
1 cup soy butter (or regular butter)
½ tsp coconut or almond extract
1 cup powdered sugar
½ cup unsweetened coconut flakes

  • Using a mixer, blend together butter, extract and sugar until well combined. Add in coconut.
    • NOTE: For a time saver, use a premade container of vanilla frosting and just mix in the coconut. Spread this mixture over the cooled brownies.
Almond Topping
½ cup slivered almonds
1 cup chocolate chips, melted
  • Sprinkle almonds on top of the coconut mixture on the brownies. Drizzle chocolate over the almonds. Refrigerate for about 2 hours to let everything set up.
    • NOTE: As always - if gluten isn't an issue for you - make them with regular brownie mix.
    • NOTE: You must share- you simply should not eat the entire pan, although the idea is very tempting….